How to Create a Neighborhood Entrance Sign: A Step-by-Step Guide

Most HOAs, builders, developers, and property managers of residential communities will agree that creating an attractive, inviting entrance to a new or existing community encourages pride among residents and significantly increases the appeal of the streetscape. This step-by-step guide will walk you through the process of successfully purchasing a new neighborhood entrance sign that will help the overall image of your community. Whether it’s your first go-round or you’re replacing a sign that’s served its purpose, this guide will eliminate many of the common mistakes made along the way. Let's get started!
Step 1: Choose a Point Person for your Community Sign Project
So, you’ve made the decision to pursue a new or replacement entrance sign. First things first:
-
Choose a point person on your HOA board or within your community to gather information, pricing, and design options.
-
Present the options to a committee or board.
As a sign manufacturing professional, I find it very helpful to have a communication line with one person who acts as a liaison between the board and myself. This makes design updates and submittals fast and easy.
Step 2: Determine the Project Scope for your Neighborhood Signs
These are details specific to your community entrance sign project that will allow you to move forward with quote requests. There are numerous items to include in the scope portion of your entrance monument sign:
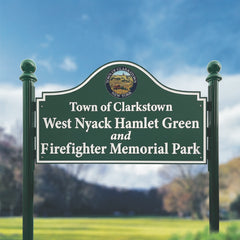
Branding and messages for your community entrance sign
A neighborhood name, logo, image, or emblem representing the community, or other messages and information such as “no soliciting”, “private community” and “children at play” are common terms to include in signage at your neighborhood entrance.
Landscape space availability at the desired location
If you’re placing the new sign in a landscaped area, measure the dimensions of the available area (length/width/height), and consider if other changes will be made to the space prior to the new sign installation. For instance, if you have plans to add bushes or large rocks to the landscaping of your subdivision entrance, then put that into consideration when planning your signage location.
Quantity of entrance signs required
If you have more than one entry road to your neighborhood or residential community, consider how many signs you will need to cover all entrances. If you need subdivision signs for multiple neighborhoods, make a list of how many you need per section. Do any areas need wayfinding signs attached to the entrance sign or nearby? Creating a map or drawing that specifies where you need each type of sign is helpful for you and the installation contractor.
Who will install the sign?
Hiring a local sign contractor is generally the best option for custom signage installation, but this can also be accomplished by a DIY team from the community to save time and money. Also, consider ease of installation. Verify that the sign manufacturer provides assembly guides for your review prior to ordering.
What sign types are preferred?
There are many design possibilities, but I recommend creating a photo pinboard of sign designs that are preferred using an internet search. Choose styles that will make a good impression on visitors to your neighborhood and enhance curb appeal. Our sign assembly options for architectural styles article includes ideas about styles to choose from that will match your community's special look.
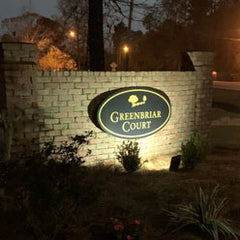
Will sign lighting be necessary?
For visibility after dark, solar or electrical ground lighting may be a great solution for lighted signs. Sign lighting can usually be coordinated through the contractor performing the sign's installation.
Do you need a single-sided or double-sided neighborhood entrance sign?
Determine if the sign orientation or position in the landscape requires the sign to be single-sided (viewed from one side only) or double-sided (viewed by traffic from both directions).
Sign Size
Determine which size sign will fit into the allowable spacing.
Local Compliance Rules
Will a permit be required for local compliance? The answer to this question is typically “yes”. A professional sign installer can handle permitting with the local municipality, but you'll need to perform the red tape yourself for DIY projects.
Final Approval Requirements
Does the final design need to be reviewed and approved by the local municipality? It's helpful to find out if there are final approval steps required now so you don't experience hangups after you install your neighborhood sign.
Step 3: Request Quotations
Most organizations require 2-3 competitive quotes for a project this size. Quotations can typically be expected within 2-3 business days from the date of request. When comparing pricing, it’s important to consider the differences in product type. For example, if the designs are dissimilar, what specifications cause the main difference in price? Are the products being quoted the same or different? One vendor might use the best materials available while another one uses thin aluminum or cheap paint. Consider the manufacturer's lead time, freight costs, and manufacturer’s warranty as well.
A physical sample can also be requested at this time. For example, you can obtain a printed vinyl swatch, a powder-coated metal piece, or a manufacturer’s product catalog for board or committee review. This is an excellent way to compare the quality of the neighborhood signs up for consideration.
Step 4: Create a Budget for the Project
Based on the quotes received, develop a budget for your community entrance sign project. Determine the expected minimum and maximum potential cost.
Step 5: Proceed with Concept Drawings
Most sign manufacturers have design departments to provide a drawing for the products they supply. This is the time to request a drawing for your project. Drawings are typically provided free of charge as a part of the proposal, but be sure to confirm drawing costs prior to requesting. It’s one of the most exciting parts of the process: bringing ideas to life, on paper. Things to consider for the design of monument signs:
-
Size – Length, width, and overall height of the final monument.
-
Shape – Rectangle, scallop, oval, or bell are all common.
-
Color Scheme – What colors will best represent the neighborhood? House trim colors are always a nice compliment to the streetscape, creating a distinctive but balanced first impression in a subdivision entrance.
-
Mounting/Display – Decide how will the sign be supported, either with decorative posts, a brick or stone monument wall, or another option.
-
Substrate – Determine if the sign will be dimensional or flat. Also, decide on the material used. Are metal signs preferred, or is plastic or wood more appealing? Signature Streetscapes uses high-quality aluminum panel signs in our Entrance Assembly Series.
-
Logo, insignia, seal, or emblem – Adding an emblem or logo is a great way to personalize the sign for your neighborhood. The branding instills pride in its residents. Visitors get a positive first impression and associate your neighborhood with the look and feel expected when they see the emblem elsewhere.
-
Optional information or text to consider: Think about changeable messages, or specific words such as “clubhouse”, “office”, “private community” or “no soliciting”.
Step 6: Purchase Decision
Choosing the final design and awarding a contract to the manufacturer can be a time-consuming task, depending on the number of people on the committee. It often requires a unanimous committee or board vote. Carefully discuss each quote. Consider all factors listed above as well as your gut feeling in dealing with each of the companies who provided quotes. Once you've made a decision, the hard work is complete. Now it’s just a matter of time before your ideas become a reality.
Step 7: Receive and Inspect Shipment
Manufacturer lead times can vary from 2 weeks to 12 weeks depending on current market conditions. After your package arrives, take time to inspect the materials and provide immediate feedback to the shipper or carrier in case any damage was sustained during transit.
Step 8: Schedule & Complete Installation
Contact the sign installer for an installation schedule. At this time, permits should be displayed and the final, approved drawings should be in-hand.
Step 9: Final Inspection
Once installation is completed and the HOA board is happy with the results, you or the signs installer should contact the local municipal inspector to complete a final inspection and obtain their signature to complete the permit.
No matter what the size of your community, a new entrance sign can have an immediate impact and add memorable curb appeal to the streetscape. I hope this guide is useful to make the process a little less daunting and a lot more successful!

Easy to Order Entrance Signs
Signature Streetscapes is excited to announce the release of our new Entrance Sign Assembly Series. In this brochure, you’ll find attractive entrance sign designs that provide economical, yet beautiful neighborhood or subdivision entrance signs. They all allow for considerable flexibility in size, shape, and graphical elements while utilizing our proven durable aluminum components. You can also request a copy by mail. Thank you for considering Signature Streetscapes for all your signage needs.
About Steve Snuffer

Steve has worked in the architectural sign industry for 31 years beginning in operations and focusing most recently on sales. His knowledge of project management, design, quality and fulfillment gives our clients peace of mind throughout their entire experience. Steve holds a Bachelor of Science degree from Western Michigan University.